Saving images for your website

Saving images for your website
Updated 22nd October 2017
Hello!
I want to talk to you about saving images for your website and why it's important to make sure they're optimised before you post them online. There are tools you can use to optimise images once they're online, but they can become expensive if you have a lot of images to optimise.
Images are very important for a website. They can convey so much more information than a few simple words can, but uploading images to your website requires a little thought. You don’t just want to take a photo with your nice, new, shiny camera or phone and upload it to your website, it will be far too big. You need to think about how people are going to view your images and people just don’t wait around for images to load online any more. In a world of mobile websites, speed is king.
There are numerous ways in which you can save an image for the web, but today I am going to be talking about saving images using Adobe Photoshop. You can get it for under £10 a month (have a look here). I will talk more about the alternatives to Photoshop in a future post.
Why not just 'Save As JPEG'?
If you save your image as a jpeg using Photoshop’s ‘File > Save As’ option, you are creating an image based on all the data that you have in Photoshop. So if the image is a large, 300 ppi, CMYK image that has lots of metadata attached such as model of camera, location the picture was taken, colour profiles etc, all these extra metadata files will be saved with the image and create a large jpeg image originally designed for print. Web browsers don't want this extra metadata and so it's better to make sure that your images are saved without them. Consider your mobile users, get rid of all the excess bloat and optimise your images.
Optimising your image
Let’s start off by opening your image in Photoshop. In this example I will be using Photoshop CC 2015.5 but I have checked Photoshop CC 2017 and CC 2018 and both have the same settings.
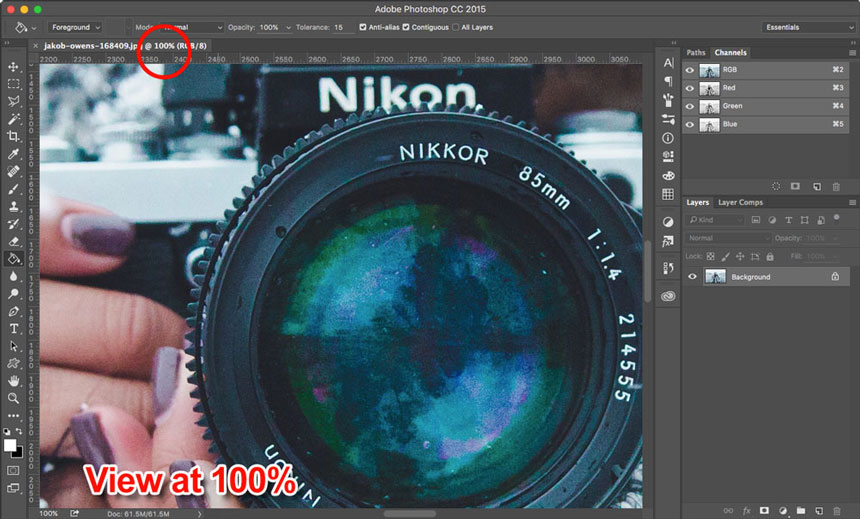
First, make sure that your image is in RGB mode. If it isn’t, convert it to RGB by selecting ‘Image > Mode > RGB Colour’ from the top menu. Saving a CMYK image for the web will convert it to RGB automatically, but doing so before hand will reduce the file size even more, and since that is what we are trying to achieve, it’s best to do this first.
You’ll want to view your image at 100%, as this is the size it will be seen on your website, once uploaded. If it is very large, it will need to be re-sized.
.
At this stage you’ll probably realise that the image you have is very large and needs re-sizing. However, Photoshop’s ‘Save for Web (Legacy)’ and ‘Export As’ features can do this for you so you don’t have to re-size the image before you go to save it. Although, if the image in question is very large, it might be an idea to reduce the size first, to speed up the Save for Web process. I’ll talk you through the two best ways of saving an image for the web using Photoshop.
* It is not advisable to enlarge images in order for them to appear larger online, as it will undoubtedly result in a poor quality image, and nobody likes looking at those. *
Saving your images
There are several ways of saving an image that can be displayed on the web, but the current best two ways of saving an image for the web from Photoshop, are ‘Save for Web (Legacy)…’ and ‘Export As…’.
Save for Web (Legacy)…
This is the way you have always been able to save images for web in Photoshop. It has been around for many years and does an excellent job of allowing you total control over how your image looks and how you can control the size of the image. However, those of you with a keen eye might have noticed that as of Photoshop CC 2015, Adobe has added the word ‘Legacy’ at the end of Save for web and has moved it from ‘File > Save for Web…’ to ‘File > Export > Save for Web (Legacy)…’. Legacy is computer talk for soon to be obsolete. However, I have checked in Photoshop CC 2018 and it is still there so we have a while yet before it eventually disappears.
So, to save your image, go to ‘File > Export > Save for Web (legacy)…’ and up pops the save window with lots of options. Let’s go through these options.
First of all make sure that you are viewing the image at 100%, by checking the ‘zoom level’ in the bottom left hand corner. If you were viewing the image at 100% before you decided to save, it will show this by default. Now that you can see the image at the size it will be displayed online, you can use the ‘image size’ option or the ‘percent’ options in the bottom right of the window to change the size the image will be displayed. So, for example, if you want an mage to be no bigger than say 1000px wide, you can set this size in the image size option and the height will change automatically.
Once you have the image at the correct size you want, you’ll be wanting to choose an image format. There are 5 different image formats to choose from. There’s GIF, JPEG, PNG-8, PNG-24 and WBMP and each has their own reason for usage. Let’s go through each of them.
GIF:
A GIF, or a Graphic Interchange Format, is an image format that has a limited palette of just 256 colours and so it is not good for high quality graphics or photos. However, if you have a simple graphic, the GIF format is a good format to use. A GIF also allows you to save an image with transparency, but not ideal if the transparency includes a gradient of any kind, like a drop shadow for example. It also has the very popular ability of being able to be an animated GIF, but we'll look at animations in another post.
JPEG:
JPEG stands for ‘Joint Photographic Expert Group’. It was named after the group of people who created it. Rather nerdy, but rather cool, I think. It’s probably the most commonly used image format online and is used primarily for photos. It allows you to create images with millions of colours at high quality and you can control the file size of the image by reducing its compression and therefore its visual appearance. This file format makes for good quality images at small file sizes, but it does not support transparency.
PNG-8:
A PNG-8, or Portable Network Graphic (8 bit), is similar to the GIF in that it has a limited palette of 256 colours and allows transparencies, but the PNG-8 will be a slightly smaller file size than the GIF. Think of it as a more modern version of a GIF.
PNG-24:
The PNG-24 image format is like the PNG-8, but is able to hold millions of colours and is therefore much better at reproducing high quality images with transparency. The downside of this colour increase is that they will create a much larger file size.
WBMP:
A WBMP, or Wireless Bitmap, is an old image format that was used for first generation mobile devices and PDAs. This image format is a very basic black and white and is rarely used today and is not present in recent versions of Photoshop.

Optimising:
Now that you know what the image format options are, which is the best to use? Well, this depends on the type of image you have and how you want to present it online. Based solely on the information above, we can deduce that if you want a high quality image without transparency, you would choose JPEG. If you wanted a high quality image with transparency you would choose PNG-24 and if you wanted a simple graphic with or without transparency you would choose PNG-8 or GIF.
The great thing about ‘Save for Web (Legacy)…’ is the options it gives you in choosing how your images can be reduced in size. Reducing the amount of colours in an image for example doesn’t necessarily mean a drop in quality, but it will mean a drop in file size. Save for Web (Legacy) is a great environment to experiment with reducing colours to see the results and using the 2-up and 4-up options at the top of the window, allows you to see the visual results of different options simultaneously, allowing you to make the best decision in the shortest time.
Three out of the five image formats mentioned have the added option that you are able to optimise them further. Both the GIF and PNG-8 image formats have the option of reducing the amount of colours available, therefore reducing the file size. Whilst the JPEG image format has a ‘Quality’ option that will enable to you increase the compression and thereby reducing the visual quality. This is done by removing data that is deemed unnecessary. It also has an ‘optimized’ tick box that if ticked, will reduce the file size even further. A PNG-24 image format doesn’t have the option to reduce it’s file size, it will always save at the highest quality.
My favourite feature of Save for Web(Legacy) is the ability to reduce the maximum amount of colours in either a GIF or PNG-8 format. This means that rather than having the maximum 256 colours, you can reduce this number down based on the amount of perceived colours in the image. So, for example, if you have a logo that just has four colours, you can just use four colours rather than the full 256. This significantly reduces the image size even further without reducing the visual quality. Or if your logo has three colours and a transparent background, you can just choose to use three colours, with transparency being the fourth ‘colour’. Have a play around and see what file sizes you can create using this PNG-8 formats.

Export As:
Export As is Photoshop’s replacement for ‘Save for Web’. It has many different and cool features, has a better compression algorithm, but in my view is still lacking in certain features that Save for Web has always had. That’s why I’m talking about both.
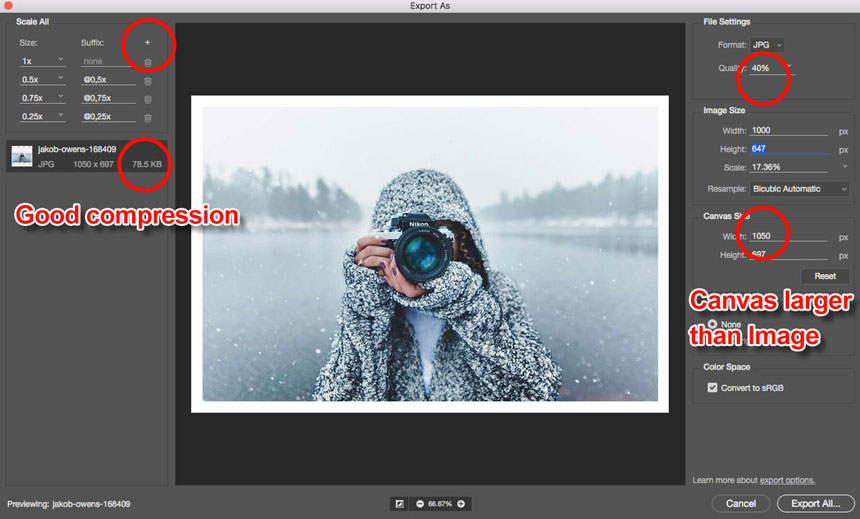
Just like with Save for Web (Legacy), you’ll want to make sure that you are viewing the image at 100%, by clicking on either the plus or minus buttons at the bottom of the window. You are able to change the image size by using the options on the right of the window, but what is new and different in Export As, is you now have the ability to also change the canvas size. This will allow to you create space area around your image if you wanted to make a simple border, for example.
You can choose to keep or remove any copyright metadata you may have, and just like Save for Web (Legacy), you will want to make sure that all your images have ‘Convert to sRGB’ in the colour space section. This is so that all web browsers will be able to show the images in the same way.
Export As has the same file formats as Save for Web (Legacy), except for WBMP, but with far fewer options. It also has an image format that Save for Web (Legacy) doesn’t, and that is SVG.
SVG:
An SVG, or Scalable Vector Graphic, is an XML based text file that describes how they should appear when viewed on screen. The benefit of this image format is that they are resolution independent, meaning they can be enlarged without a drop in quality. These files are created mainly for logos and simple graphics created in programs such as Adobe Illustrator. However, Photoshop CC now has support and they can be used if using vector graphics. SVG files are rendered and used differently to the other image formats in this blog and so I will leave talking about SVG files for another post.
One of the new features of Export As is the ‘Scale All’ section on the left. Clicking on the little ‘ + ‘ button to the right of the Suffix, will add an extra version of your image to the list you already have. Each click of the + button will generate a different file size of the same image that can be changed using the dropdown arrow next to the size. This allows you to save multiple versions of your image at the same time by clicking the ‘Export All…’ button. This is useful if you need to use your image in many different places at many different sizes i.e Desktop, tablet, mobile, thumbnail etc.
So, which way is best?
That depends on what image you have. The Export As way of saving has great potential and is certainly the future as far as Adobe are concerned. It has some fabulously clever features that are not available to you in Save for Web (Legacy). However, the best features of ‘Save for Web (Legacy)’, such as viewing the image in 2 up and 4 up, being able to compare against the original image, being able to view the image in a browser before saving, being able to save presets and, my favourite, being able to reduce the amount of colours in a PNG-8, are all currently missing from Export As.
Final thoughts
The good news is that Adobe have stated here that they do not intend to get rid of Save for Web (Legacy) until all the features that makes Save for Web (Legacy) great become available in Export As. So for now, I suggest you continue to use the great features of Save for Web (Legacy) without worrying that it will disappear any time soon, but try and get to know Export As, and it’s new features, because that’s where the future lies.
If you have a comment or want to ask any questions about saving images for your website, please leave a message below.
Until next time…
Colin
Share the love!

FREE DOWNLOADABLE GUIDE
Great Visuals Will Enhance Your Brand.
Download our free guide to learn how you can use graphic design to attract and communicate with your audience. Engage your visitors and sell more through persuasion using great visuals.
I have just started a blog and have been revisiting some notes and work from evening classes I took a couple of years ago. I have especially been trying to recall what I learnt about images and I came across your post without looking! Lot of really useful information here. Thank you Colin.
Thanks Laura
I’m glad it was of some use.
Thank you – have you posted on the alternatives to photoshop?
Hi Fatima
Not yet, but I plan to do this soon. keep an eye out or sign up to my newsletter to be the first to know when it goes live.
Or, if there is anything specific you would like to know, just ask.
Hi Fatima
Here is my latest post on alternatives to Photoshop. Hope you find it useful:
http://cptcreative.com/saving-images-for-your-website-without-photoshop/